Get Started
(Note: These instructions currently OSX specifix because of brew but does work on other OSes.)
Before you install the library there are some minimal environment setup steps.
Docker setup
Install and start Docker:
brew cask install docker
open /Applications/Docker.app
Build Example Image
Dockerfile
FROM google/cloud-sdk:slim
RUN pip install jupyterlab notebook pandas
RUN  /bin/echo -e '#!/bin/bash\njupyter notebook --notebook-dir="/" --ip=0.0.0.0 --allow-root --NotebookApp.token=""' > /usr/bin/notebook && \
    chmod +x /usr/bin/notebook && \
     /bin/echo -e '#!/bin/bash\njupyter lab --notebook-dir="/" --ip=0.0.0.0 --allow-root --NotebookApp.token=""' > /usr/bin/lab && \
    chmod +x /usr/bin/lab
WORKDIR /current
CMD notebook
This Dockerfile uses the current directory as the workspace, and will
look for all files there and the build command,
docker build -t notebook -f Dockerfile ., will create a local docker
image called Notebook, which uses the google/cloud-sdk as a base
image. The Dockerfile also then makes a couple of small scripts to make
it easier to launch notebooks or jupyterlab.
Install pydocker
pip install sq-pydocker
Setup ssh for pydocker
pydocker init
This will copy your ssh keys, and create a new config based on your main square config, but modified because of running in a docker container. This only needs to be run the first time.
Using pydocker
Usage: pydocker [OPTIONS] COMMAND [ARGS]...

Options:
  -v, --verbose
  --help         Show this message and exit.

Commands:
  agent
  init
  launch
  remove
  remove-all
  status
  stop
  stop-all
Start ssh-agent container
If you need to have the ability to ssh into machines you can start an ssh-agent in a container with:
pydocker agent
This will add keys copied with the init command without passwords
automatically, or print the command you need to run to add password
protected keys. This ssh-agent container will then be connected to
all other containers, so you don’t need to keep entering your key
password. The makes it more secure by not storing any credentials in the
Image. This container can be restarted when needed, if you run
pydocker agent it will delete the container, and make a new one.
Launch
Options:
    -i, --image TEXT        Docker image
    -n, --name TEXT         container name
    -d, --working-dir TEXT  host directory to mount
    -p, --port INTEGER      Host port to be connected to container port 8888
    -l, --no-logs           disable streaming of container logs
    --gcloud / --no-gcloud  include gcloud credentials
    -c, --command TEXT      command which is passed to container
    -r, --rm                enable auto-removal of the container on daemon side
                            when the container’s process exits
    --help                  Show this message and exit.
This command launches the notebook (which we built above) and forwards
internal port 8888 to the laptops port 9000 and creates a container
named test. In addition the host’s current folder . is mounted in
the working_dir folder. This gives the container access to the host
filesystem. After running the command you can go to localhost:9000
in your browser.
pydocker launch --image notebook --name test --working-dir . --port 9000 --no-gcloud
Remote images also work:
pydocker launch --image jupyter/minimal-notebook:latest --name example --working-dir . --port 9000 --no-gcloud
Will pull the remote image down first. You can still do
docker pull IMAGE and pydocker will use the already downloaded
image.
Google Cloud Setup (optional)
This is only required if you are going to be using Google Cloud. If you
already have gcloud installed, update by running
gcloud components update. If you have not setup Google Cloud
already, begin by installing Google Cloud.
Download the (archive)(https://cloud.google.com/sdk/docs/quickstart-mac-os-x) and unpack it (only do the “Before you begin” section).
Navigate to the folder containing
google-cloud-sdkand run./google-cloud-sdk/install.sh
Set your gcloud account and project.
gcloud auth login
gcloud config set account ${USER}@DOMAIN.com
gcloud config set project YOUR_PROJECT
gcloud auth application-default login
Now generate your ssh credentials by running:
gcloud compute ssh --zone "us-central1-a" "RUNNING_VM"
Status Server
pydocker status
This will open a status server which will show a page with information about all local containers. This includes a link to clink into any with open port forwarding.
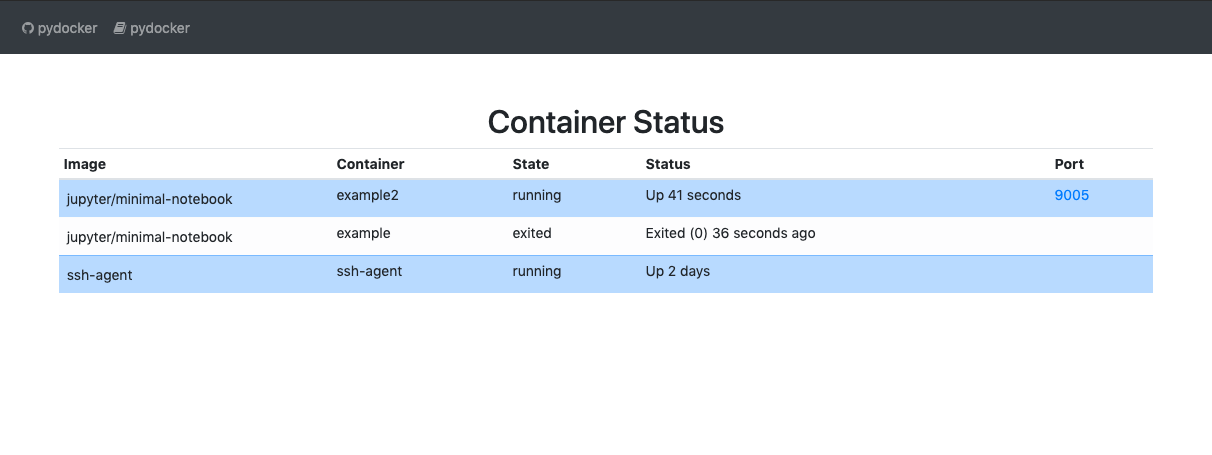
Container Status
Remove Containers
pydocker remove-all
pydocker remove CONTAINER_NAME
This delete all running containers, or just the one selected.
Stop Containers
pydocker stop-all
pydocker stop CONTAINER_NAME
This stop all running containers, or just the one selected.